WordPress, in simple words, is a publishing platform used to create blogs and websites.
It allows a unique and customizable consumer interface, which feeds tens of millions of websites worldwide, with many massive manufacturers such as New York Times Blogs, People Magazine, and PlayStation.
Step 1: Choose WordPress as your Website Platform
With more than 65 million websites and blogs created in WordPress and large companies like TechCrunch and CNN that use it, it’s no surprise that marketing specialists and developers recommend it.
It is known that the WordPress platform has many benefits: at no cost, it has a passionate community and developers are rapidly expanding their selection of themes, designs, and add-ons to allow you to meet any need or purpose of the website.
Content Management Systems (CMS) usually give you some easy-to-use tools so that you’re able to edit the content of your site without having knowledge of coding. WordPress provides the facility of CMS through which you just need to create pages and publish them to the web.
While most WordPress plugins are used as blogging platforms, they can be adapted to any organization or company, from an e-commerce store to a social media community.
Statistically, 52% of all websites are built on WordPress.
Step 2: Pick a name for your website, buy a domain & web hosting
To build a website you will need a domain name and web hosting.
A domain name is a name or you can say an address of your website, for eg. mywebsite.com. You can go creative while choosing a domain name. But small things that you should keep in mind like domain name should be relevant to the subject of your website. It could either be the name of your organization or a combination of niche-related keywords that defines your organization. It should be, of course – unique, easier to speak and memorize. You need to register your domain name, after checking availability.
Web hosting is a home place for your website on the internet. To keep your website alive on the internet you need web hosting.
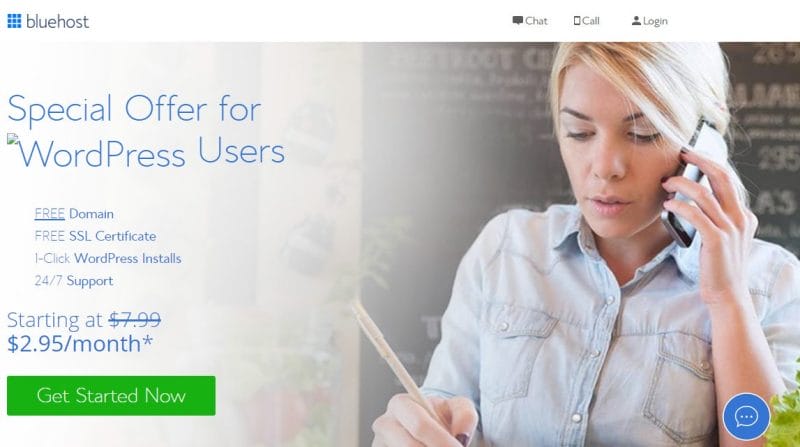
Bluehost is the official hosting partner recommended by WordPress. Bluehost offers free domain name registration for WordPress websites and its hosting costs start from $2.95/month.
How to buy a domain & web hosting with Bluehost?
Open www.Bluehost.com in a browser for free domain and web hosting. You will see the homepage of the Bluehost, click on the ‘Get Started Now’ button.
This will launch a pricing page, in which 3 types of plans are available. Basic, Plus, and Choice Plus.
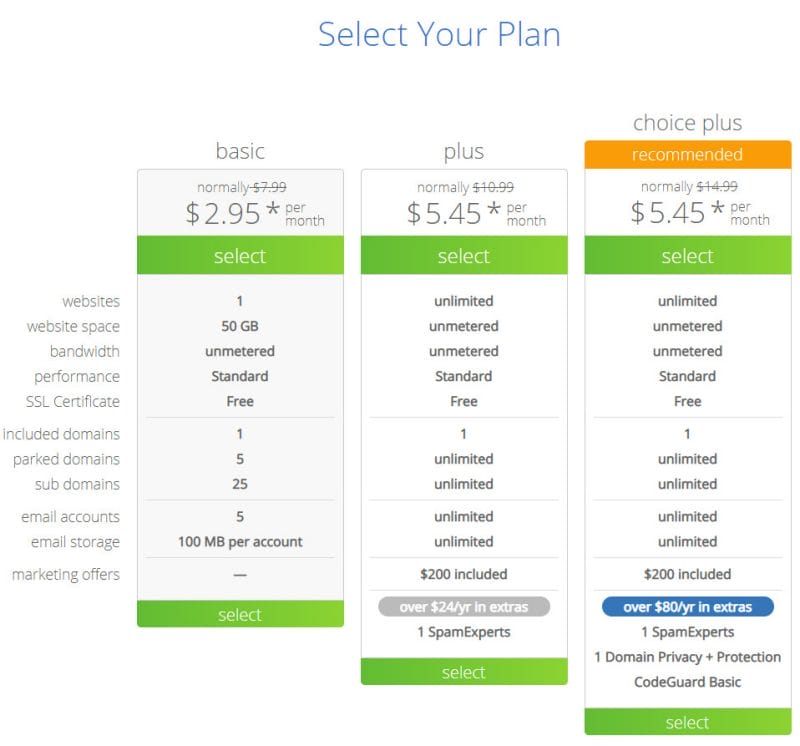
If you are beginning with a new website it is better to go with the Basic plan. Afterward, you can upgrade your plan.
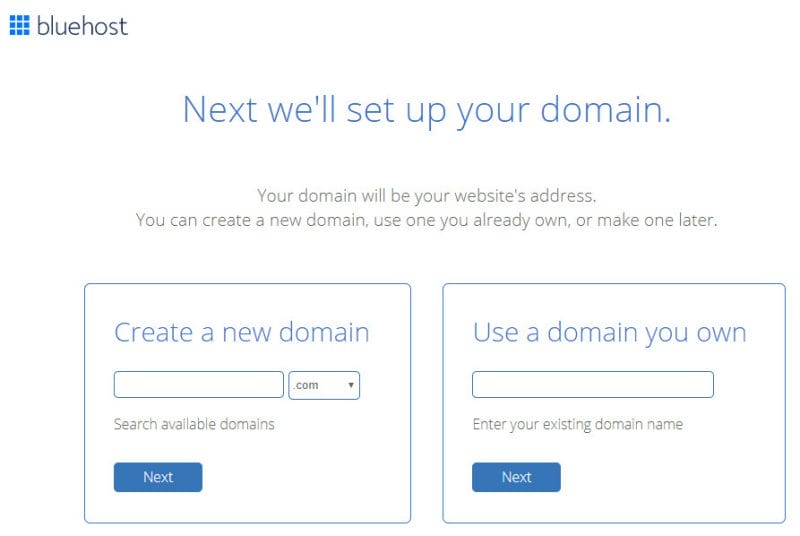
Once you ‘select’ your plan, you will be on the domain sign-up page. Here you can get a new domain by checking availability or if you have a domain already, then enter your domain name and continue, click on the ‘next’ button.
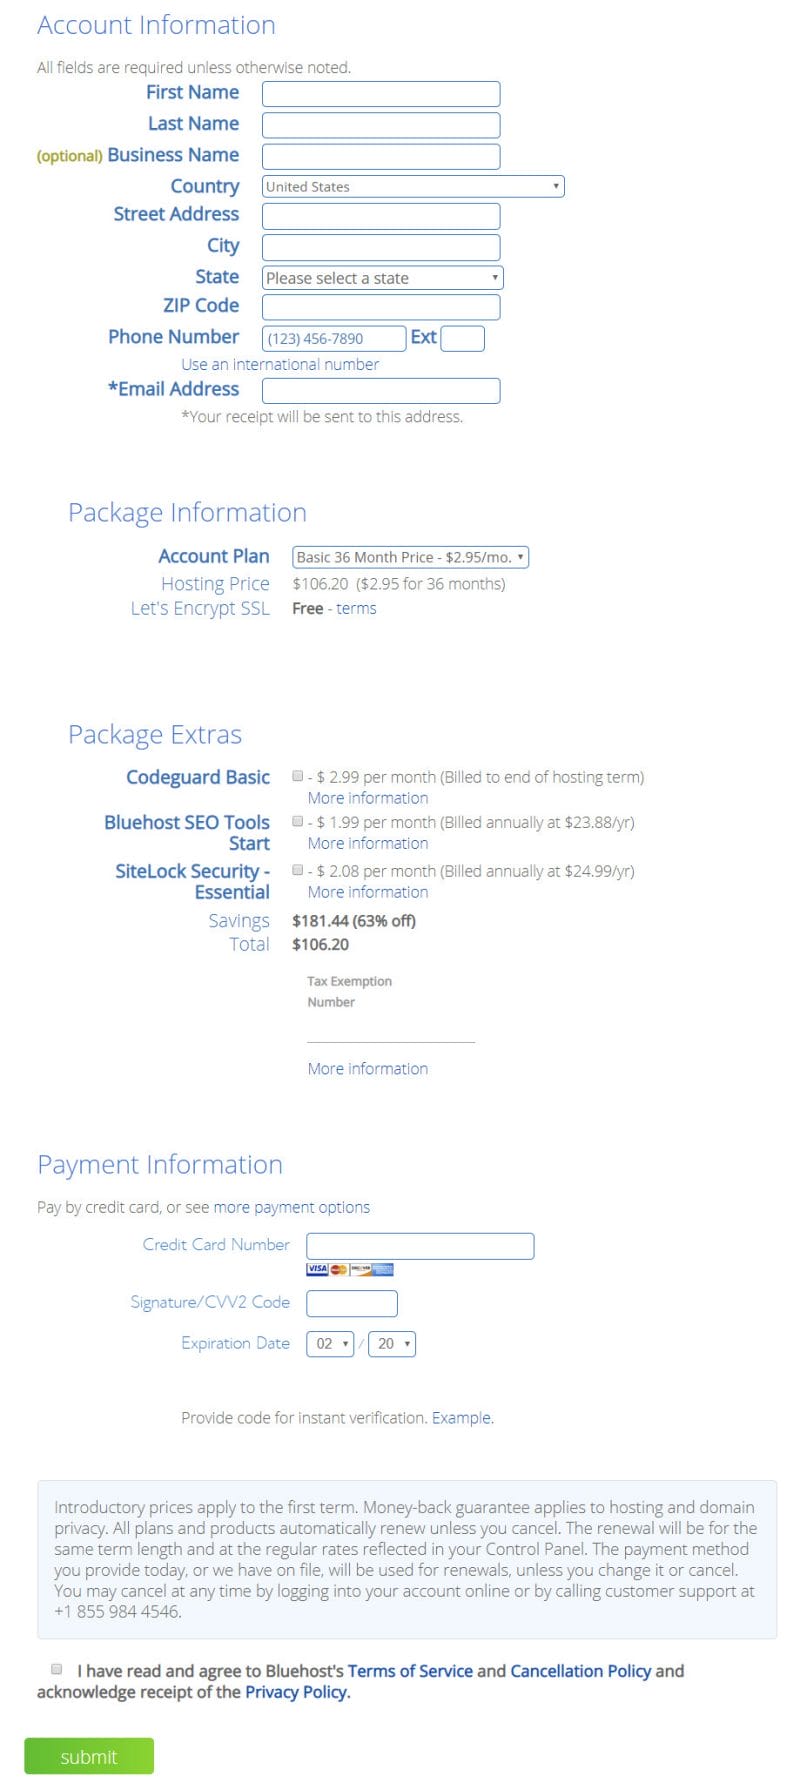
Now, you need to fill in your personal information and select a package. Also, select options for Package Extras (if you want to).
And finally, add your payment information, right check the box to agree to terms and conditions, and click on the ‘Submit’ button to finish.
You’ll receive an email having details of how to log in to your web hosting control panel aka cPanel. This is a dashboard from where you’ll install WordPress.
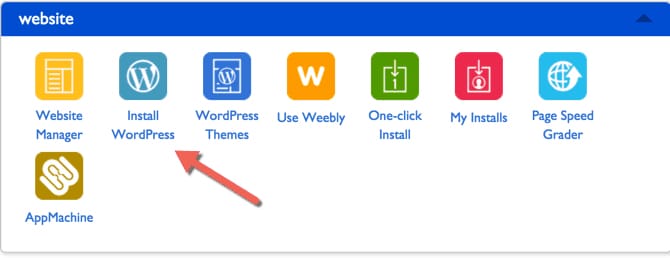
Install WordPress from Bluehost
Use login details and log in to your Bluehost account. Once you logged in, in cPanel click on the WordPress icon, in the website section.
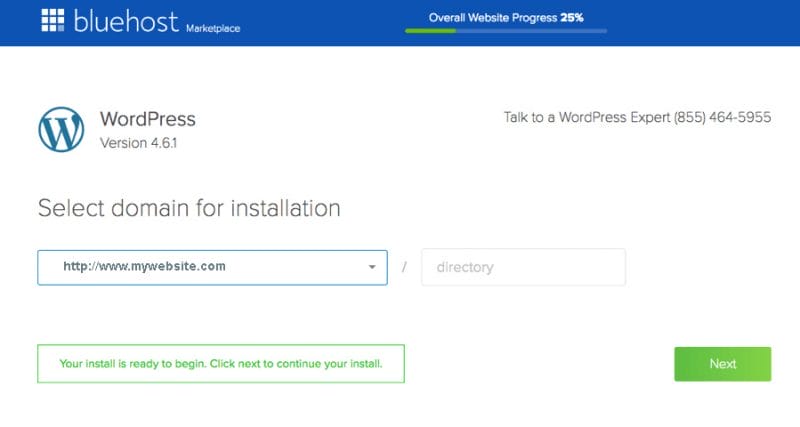
Click on the ‘Get Started’ button to continue that you will see in Bluehost Marketplace Quick Install screen for WordPress.
On the next screen, select the domain name where you want to install WordPress. Click on the ‘Next’ button.
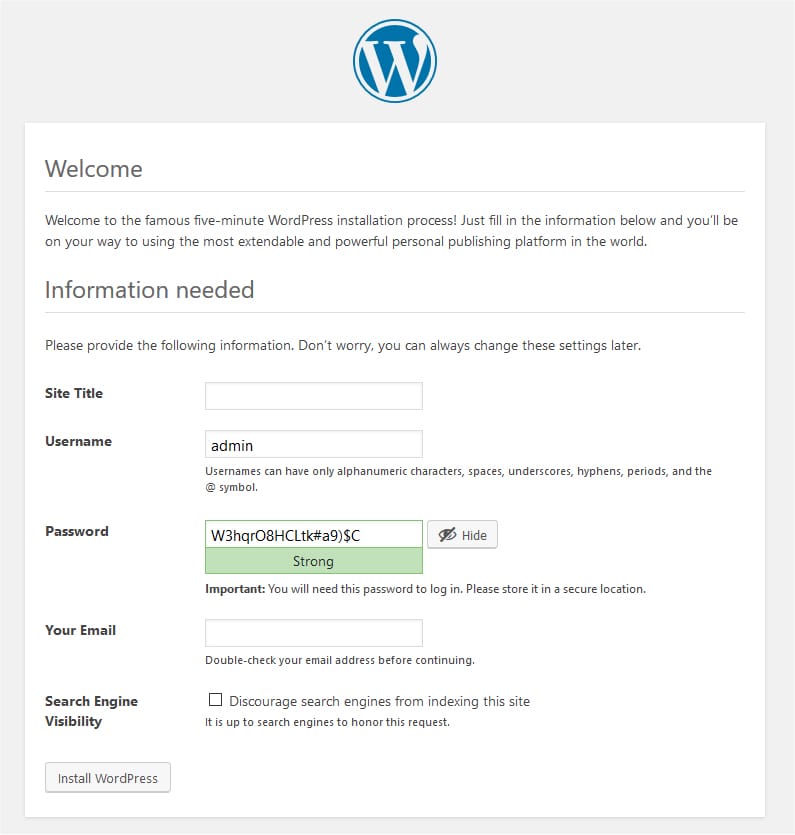
Enter your website name, admin username, and password. Check all the checkboxes and then click the ‘Install’ button to continue.
After installation is over, you’ll see the ‘Installation complete’ message in the top header.
Step 3: Get familiar with the WordPress UI
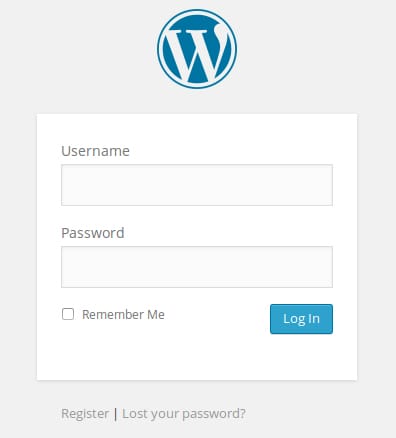
Now you can go to the WordPress login page. Your login URL will be http://www.mywebsite.com/wp-admin. Enter your username and password and you can log in to your WordPress website.
After successful login, you’ll be able to see the WordPress dashboard. Here, WordPress settings can improve your experience in the WordPress interface.
a) Set permalinks
Permalinks are the permanent URLs to your individual pages. A permalink is the web page address that is used to link to your content.
Go to Settings > Permalinks, in the sidebar in your WordPress dashboard.
b) Making your site public
Go to Settings > Reading, and unchecked the box labeled “Discourage search engines ..”. It helps Google to find and index your website.
c) Set your website title and tagline
The site title and tagline appear at several places on your site. If you don’t have a tagline for your website, you can leave the tagline block blank.
Many WordPress themes are available that display this title and tagline on the homepage and in SEO description – which are used to list your website on the results pages.
Go to Settings > General to set the Site Title and Tagline.
d) Allow or disable comments
Let your audience give their opinions on your page helps to build your website better and more popular. But you have to be careful about spam and trollers.
Go to settings > Discussion, right check the checkbox having the message ‘Allow people to post comments if you want to allow comments.
e) Set your time zone
Go to Settings > General and you can set the time zone.
Step 4: Pick a theme for your website
WordPress comes with various themes that make your website look more professional. Each WordPress website has a default theme. It has various templates that can change the appearance of your website.
a) Choose a theme
There are many free and paid themes available on the official directory at WordPress.org that you can install on your site. More themes are also available at third-party sites like justfreethemes, themeisle, and theme forest. All free themes have various eye-catching features that can impress the viewers.
Choosing one theme does not mean that it’s final. You can also change the theme later on. WordPress has a collection of themes to choose from like business websites, food, travel, blogs, or a personal site, depending on the subject of your website, you can choose anyone from it.
All themes are mainly responsive so it also looks good on other devices.
b) Install theme
Go to Appearance > Themes, then click on the ‘Add New’ button.
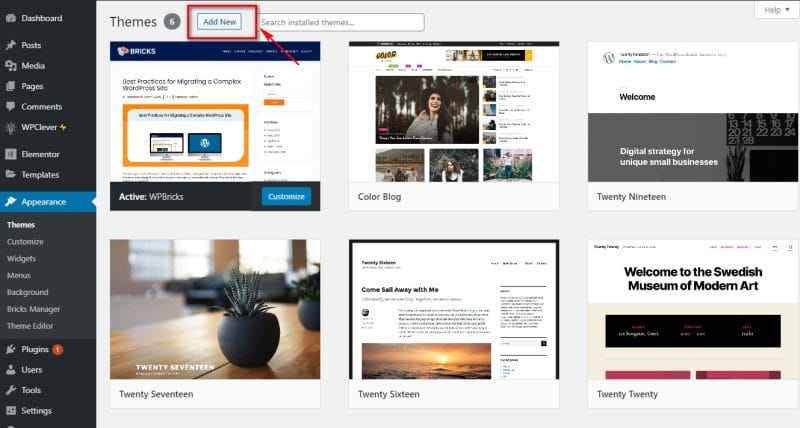
You will find a long list of themes.
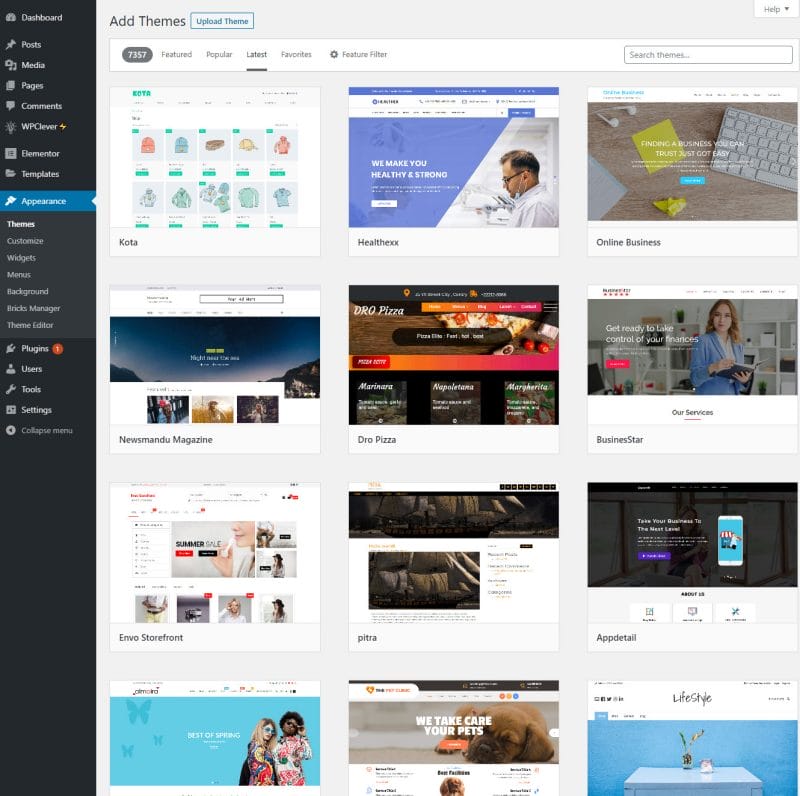
You can also browse themes using filter options like featured, popular and latest.
If you already know the name of the theme, use the search bar, enter the name of the theme, and have a look. Use the ‘preview’ button to view the theme.
When you finalize a theme, click on the ‘Install’ button.
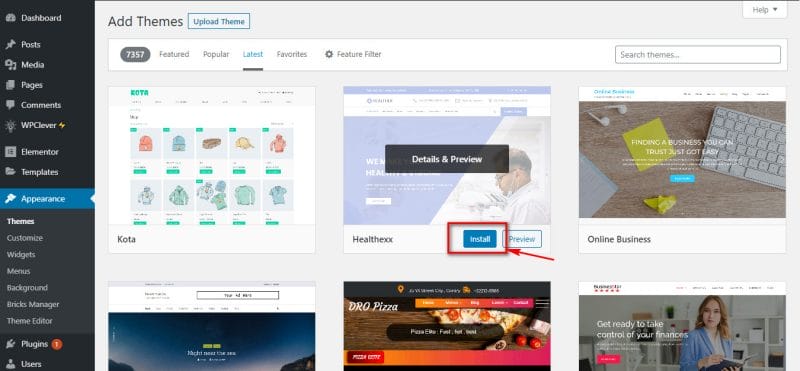
After a few seconds, the ‘activate’ button will appear. Click on it and you are ready to use that theme on your website.
c) Customizing your website
Go to Appearance > Customize, a customization page will open from which you can change various features as per your choice.
Homepage Settings:
In the Customize sidebar, go to the homepage settings tab. Select ‘A static page’. Create New Page ‘Home’ which will be under the Homepage section. This Homepage will be the front page of your website.
Under the Post page section, add a new page ‘Blog’. This will be the blog page on which you can post blogs.
Step 5: Install plugins to extend your website’s abilities
Plugins are apps for your website. Around 50,000 free plugins are available in WordPress which enhances the performance and beauty of your website.
In the dashboard, go to Plugins > Add New. Enter the name of the plugin in the search field which you want for your website, and then click on “Install” and “Activate.”
Some examples of free plugins:
- WPForms – lets you add contact forms to your website.
- Envira Gallery Lite – to add beautiful photo galleries.
- Yoast SEO – it makes your site SEO-friendly through which your site can be more accessible in search engines.
- Google Analytics – this creates more traffic to your website.
- UpdraftPlus – create automatic backups of your website.
- Wordfence Security – improves the security of your site.
- WooCommerce – the best e-commerce solution for WordPress.
Step 6: Add pages to your website
Every website has pages like about us, contact us, terms and conditions, and privacy policy. Pages have the static content of your website.
To create a website page, in your WordPress dashboard, go to Pages > Add New.
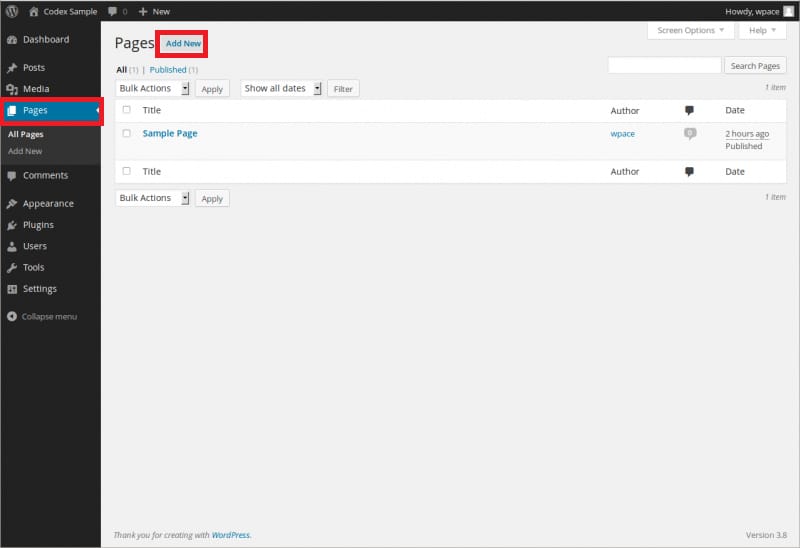
A new blank page will open in which you can fill the content.
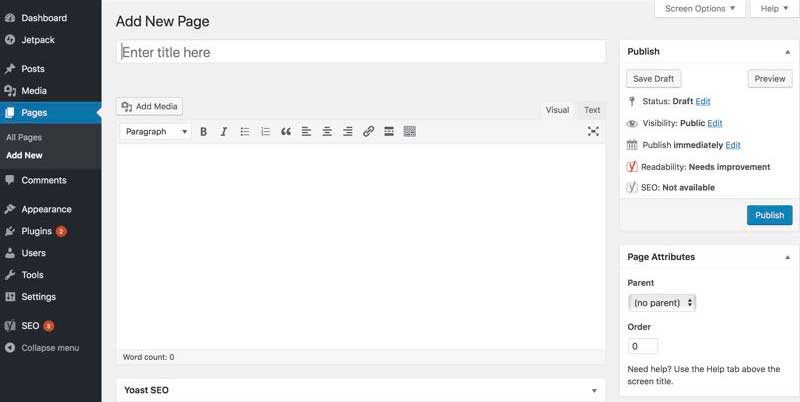
In the top text bar, you will enter the title of the page eg. Home or About Us. In the below text editor section you will add the content of the page. You can even add images, embed videos, and audio using the ‘Add Media’ button.
Once content is added to your page, click on the ‘Publish’ button and the page will be displayed on your website.
Step 7: Create a Blog
WordPress is great as a blogging platform. WordPress has in-built blogging tools you can publish articles regularly. Here it is called posts.
Blogs of your website can be added from Posts > Add new.
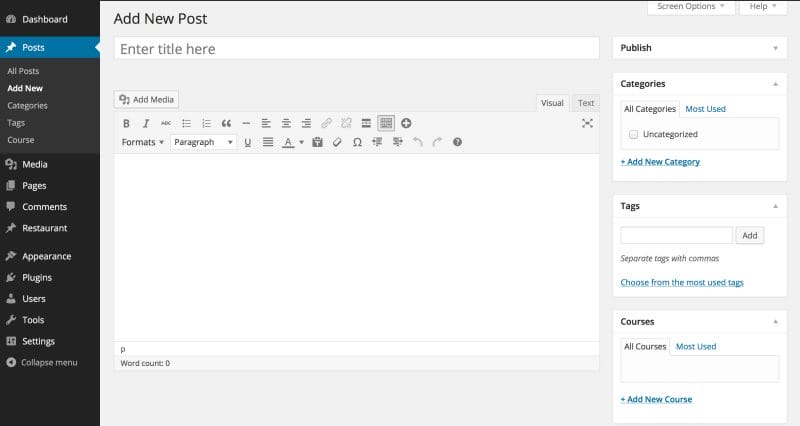
Adding content to the post is the same as in pages. One of the differences is that categories and tags can be assigned to the posts.
All posts that are added will be displayed on your Blog page on the front side.
Step 8: Menus & Widgets
The key elements through which visitors can navigate through your site easily are Menu and Widgets.
a) Menus
To add a Menu, go to Appearance > Menus.
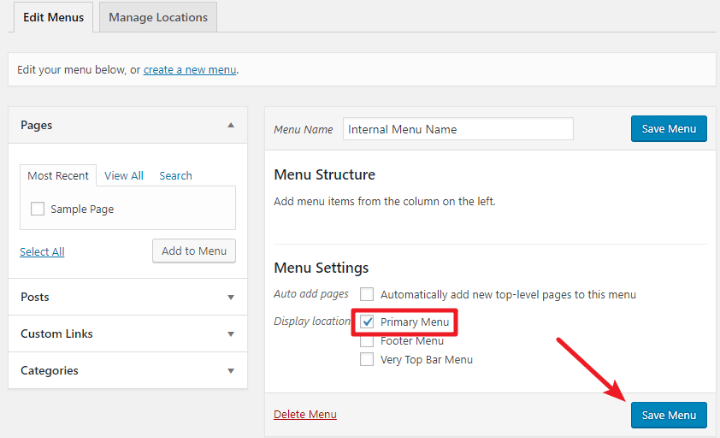
On the left side, under the page section, there will be all pages you have created from which you can choose to add to a menu. Select pages you consider to be important and add them to the menu.
On the right, you will see the menu structure and its settings. Above the menu structure, you will find a text box in which you will enter the menu name.
In the menu structure section, there will be the pages you selected for the menu. You can drag and drop the menu items to reorder them.
In Menu settings, select the location ‘Primary Menu’. By selecting it your menu will display on the top section of your website.
Click on the “Save Menu” button to save the settings.
You can create footer menus as well. Click on the “create a new menu” link and it will open the same menu creation panel. Select pages for the menu and the display location as the ‘Footer Menu’.
b) Widgets
A widget is a small content block, displayed at different places around the website. It is usually in a sidebar or footer.
To set your widgets, go to Appearance > Widgets.
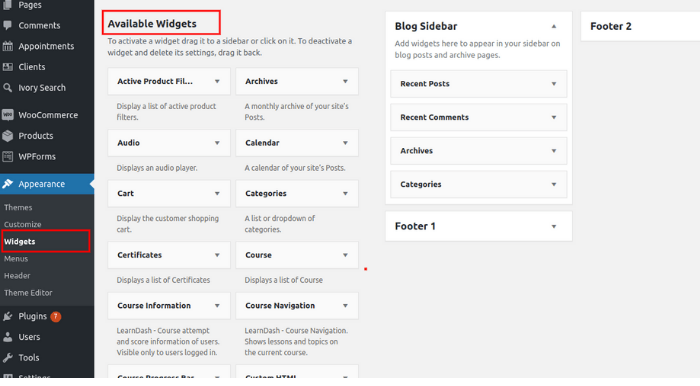
WordPress offers a number of widgets to use. To add a widget, just drag a widget from the available widgets area and drop it onto your widget area on the right.
After applying all these features, your website is ready to launch.